Monthly Archives: January 2025
-
- January 24, 2025
Changelog - 23/01/15
This changelog is just a sumarry of what has been changed recently across our products and services.
Service Updates
- ArcadeSystems Website - Server Upgrade + software updates / optimisations
- ArcadeSystems - FTP Server Upgrades + New servers online for new content.
- RetroHo - Additional Seed servers and locations added
- RetroHo - Codebase optimisation and fixes.
Products Updates
- 16TB Hyperspin Build - Tons of optimisations / fixes and updated Retroarch + Emulators.
- 2TB / 8TB / 16TB and 20TB - Launchbox Builds - Core Updated to latest available version - 13.8 + Retroarch + Emulators updated to latest available versions.
- 2TB / 8TB / 20TB Retrobat Builds - Updated to v6.3.1, Updated BIOS + Updated Emulators and enabled Auto Update for sutible emulators.
- 2TB / 8TB / 20TB Batocera Builds are all updated to a minimum version of v40 and will shortly be updated to v41 however they can also be updated online.
New Releases
- 2TB Teknoparrot + Arcade Builds (Drive + Download)
-
- January 12, 2025
How to Configure Sinden Light Guns in Retrobat for Teknoparrot
How to set up Teknoparrot for your Sinden Lightguns.
I recommend setting player 1 to be your “Sinden Lightgun Black”, and Player 2 to be labelled “Sinden Lightgun Red”.
To make sure your lightgun is setup in a compatible way, or to change your Sindens to match those settings:Plug in your Black Sinden Lightgun. Load the Sinden Lightgun application that is in the Retrobat drive. (There is a shortcut when you first click into the Retrobat drive labelled: Lightgun-Shortcut. Double click on it to load.)
The New Sinden app (preloaded) will automatically start the drivers for your 1 or 2 Sinden lightguns. The new app requires that you have firmware version 1.06 of newer (If you need to update firmware, refer to the instructions below).
You can preset 2 Sindens with this application. The tabs you may want to check out are: Main, Button Assignment A/B, Recoil, and Calibration.
I have preset everything except the step below.
If your -
- January 05, 2025
How to WRITE .IMG / .BIN using DMDE
DMDE (DM Disk Editor and Data Recovery Software) is a powerful tool that can perform low-level operations, such as writing disk images (.IMG or .BIN files) to SD cards or USB devices. This guide will walk you through the process step by step.
Preparation
Download and Install DMDE- Visit the DMDE official website to download the appropriate version for your operating system.
- Install DMDE and ensure you have administrator privileges to run the application.
- Backup Important Data
Writing an image file to a device will erase all existing data on the target SD card or USB device. Back up any important data before proceeding.
Ensure you have downloaded the .IMG or .BIN file you want to write. - This MUST be downloaded to DIFFERENT device than the TARGET device you wish to write to.
Writing the Image File
Step 1:Open DMDE
Launch DMDE as an administrator.Select your preferred language if prompted.
Step 2:Select Disk Images
Select the .IMG / .BIN Downloaded
-
- January 05, 2025
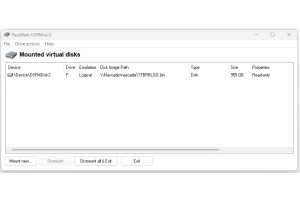
How to Mount a .IMG or .BIN File Using OSFMount
Step 1:Download and Install OSFMount
Download OSFMountGo to the official OSFMount website.
Click Download and save the installer to your computer.
Install OSFMountRun the installer and follow the setup wizard.
Accept the license agreement and choose default settings unless you need custom installation options.
Step 2:Open OSFMount
Launch OSFMount from your Start Menu or Desktop Shortcut.
Start the Mounting Process
In the OSFMount window, click Mount.
Step 3:Select the Image File
In the dialog box:Click Browse next to the Image File field.
Locate your .IMG or .BIN file and click Next.Step 4:
Configure the Mount Settings
Partition Selection:If the file contains multiple partitions, select the one you want to mount.
Assign Drive Letter:Either choose a specific drive letter or let OSFMount assign one automatically.
Set Mount Type:Select Read-Only Drive if you don’t want to modify the contents.Step 5:
Mount the Image
Once all -
- January 05, 2025
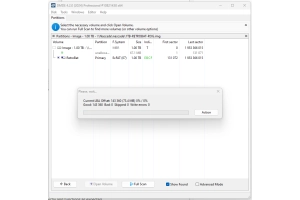
How to EXTRACT .IMG / .BIN using PowerISO
Steps to Extract .IMG / .BIN Files Using PowerISO
Download and Install PowerISODownload PowerISO from its official website if you haven’t already.
Install the software following the on-screen instructions.
Launch PowerISOOpen the PowerISO application after installation.
Click on File in the top menu.
Select Open, then browse to the location of your .IMG or .BIN file.
Double-click the file to load it into PowerISO.PLEASE NOTE THAT THESE IMAGES TAKE A FEW MINUTES TO OPEN DUE TO THE SIZE OF THEM, JUST LEAVE POWERISO TO OPEN THE FILE
Select Open.
After loading the file, click on the Extract button on the toolbar.
Alternatively, go to File > Extract from the menu.
Choose Extraction LocationIn the dialog box, select the destination folder where you want the contents to be extracted.
Click OK to start the extraction process.
Wait for Extraction to CompleteThe extraction process will take some time depending on the size of the file.
-
- January 04, 2025
Comparing Arcade Frontends: Hyperspin, LaunchBox, Batocera, RetroBat, and CoinOps
If you're setting up an arcade system for retro gaming, choosing the right frontend is a crucial step. Each frontend offers unique features, advantages, and drawbacks. In this blog post, we'll break down the pros and cons of five popular options: Hyperspin, LaunchBox, Batocera, RetroBat, and CoinOps.
1. Hyperspin
Pros:
- Highly Customizable: Hyperspin offers an extensive range of customization options, from themes to animations, allowing users to create a visually stunning interface.
- Large Community: The longstanding Hyperspin community provides access to numerous resources, tutorials, and premade themes.
- Supports Multiple Emulators: You can integrate a variety of emulators and systems into one seamless interface.
Cons:
- Steep Learning Curve: Setting up Hyperspin can be daunting for beginners due to its complex configuration process.
- Outdated Design: Compared to modern alternatives, Hyperspin's design feels